Solid-state drives, also known as SSDs, are currently more common among PC enthusiasts than hard disk drives due to their better speed and dependability. Choosing an SSD will significantly improve the performance of your desktop computer if you are upgrading from an HDD or creating a new one. You’ll observe a substantial change in how quickly apps launch, how quickly data are copied, and more. So let’s get started and walk through each step of installing an SSD in your desktop PC without wasting any time. Although installing an SSD is not particularly challenging, rookie PC builders may find the anxiety to be too much. Don’t worry, though, as we’ll show you how to pick a compatible SSD, locate the correct slot, and install the storage drive in your PC.
We will explain how to distinguish between the many SSD slots on a motherboard in this article because they each support a different SSD depending on the pin connectors. Your SSD won’t function unless it is inserted into the proper motherboard slot. Check out the linked page to learn more about the SATA and M.2 slots on your motherboard. Let’s move on to learning how to install M.2 and 2.5-inch SATA SSD in your PC now that that is out of the way.
Things to Remember Before Installing an SSD
Check SSD Compatibility with Motherboard
Up to a certain generation, NVMe SSDs are supported by every current motherboard. The majority of motherboards on the market now support NVMe Gen 4 SSDs. Additionally, Gen 3 is backwards compatible with these slots. Before continuing with the guide for installing an SSD, we advise you to configure M.2 slots in your BIOS. Here are your finest options if you’re looking to purchase an inexpensive SSD.
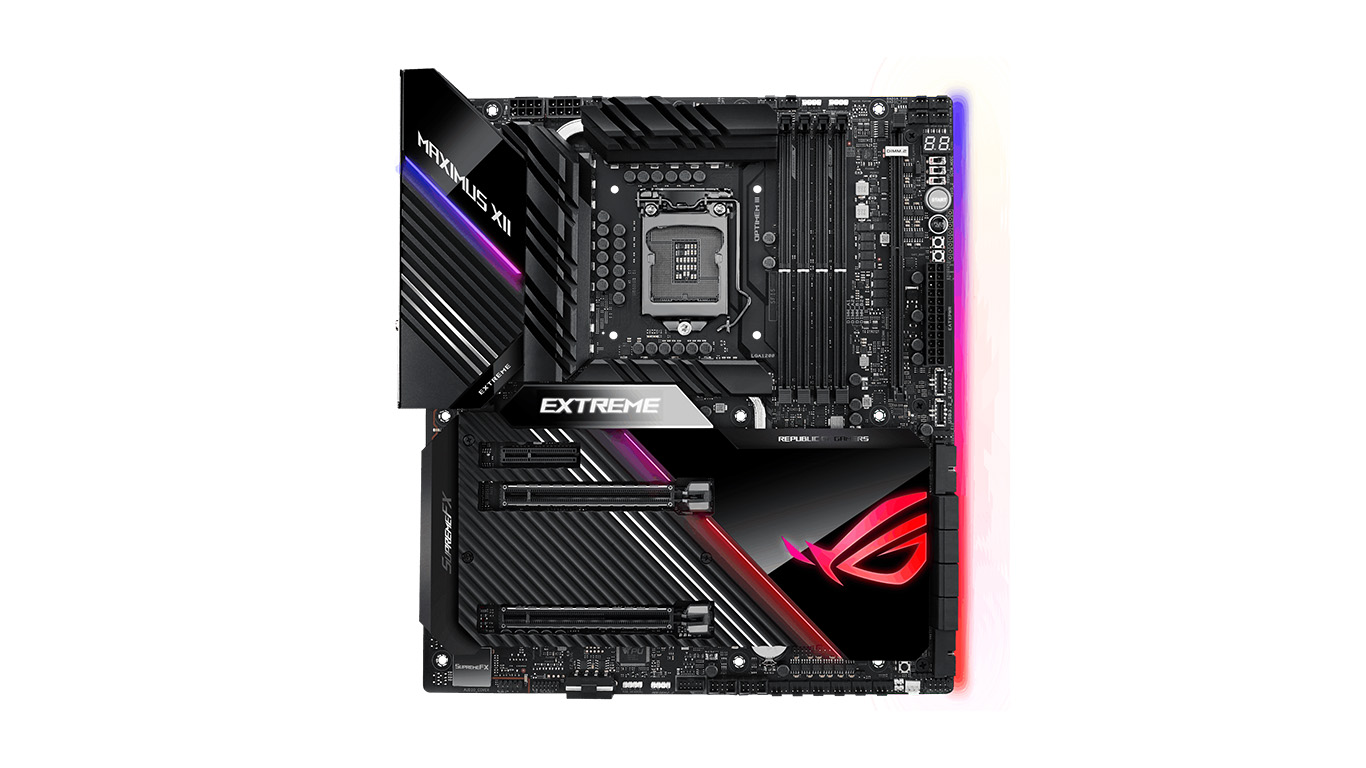
There are other SATA SSDs available in the 2.5-inch or M.2 form factors. The M.2 SATA SSD slot and the NVMe M.2 SSD slot are two different things. To confirm which M.2 slots you have accessible, see the instructions for your motherboard. Additionally, some motherboards now offer NVMe Gen 5 SSDs, which enable Ryzen 7000-series CPUs and Intel’s 13th Gen Raptor Lake CPUs (see Core i9-13900K review). These brand-new SSDs, nevertheless, are now in production and rather pricey.
Migrate or Install the Operating System
Have the installation disk for a new operating system handy, or be prepared to migrate your current OS. In our experience, cloning Windows partitions onto a fresh SSD can occasionally result in a few problems. The best course of action is to run a clean install of Windows 11 on your new SSD after backing up all of your data. In the event that you do need to save your OS partition and its contents, there are numerous OS migration programs out there.
Check for Required Power Cables
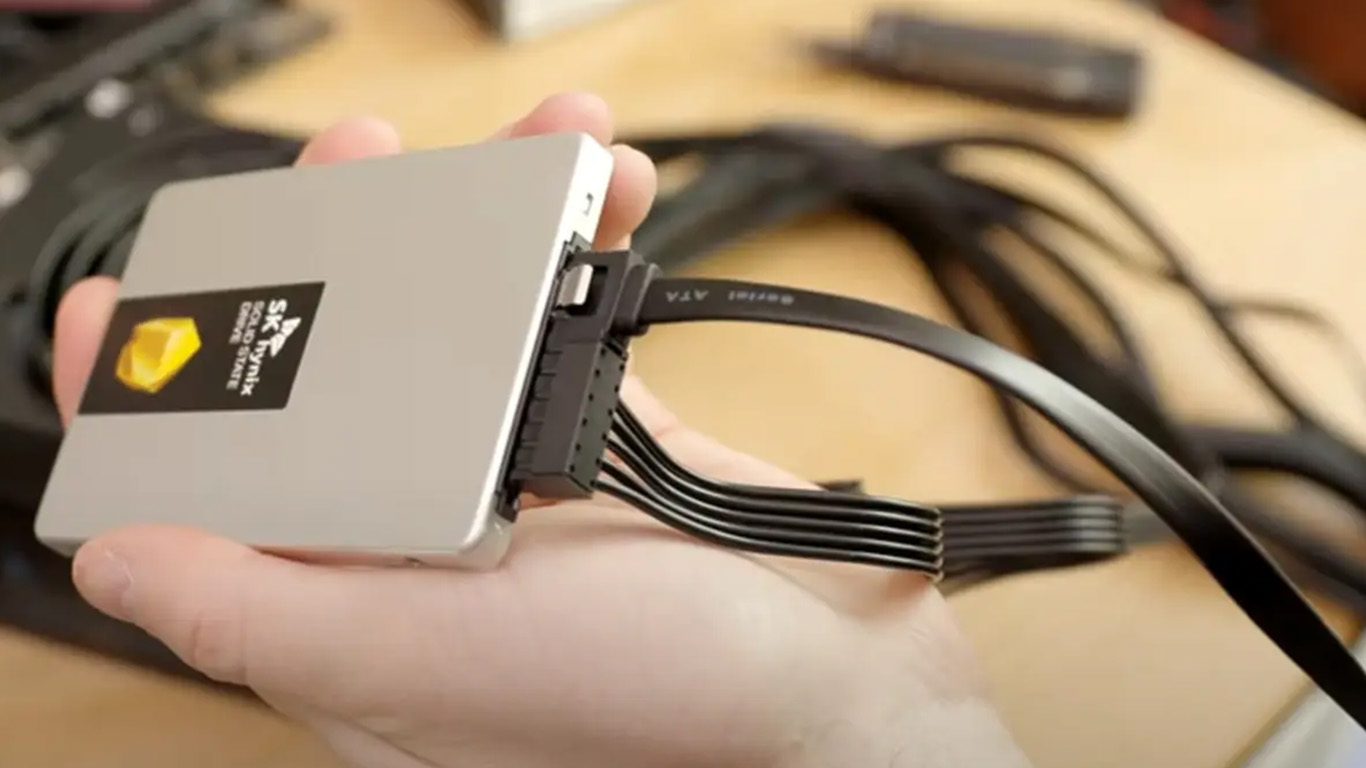
The motherboard of your computer is connected to the power supply (PSU) through a number of connectors. You will discover SATA power connectors among these connectors; you must have one ready before installing a 2.5-inch SATA SSD in your PC. You will also need a SATA cable, which is included in the motherboard box and is also sold online. These SATA power cables and connections have this appearance.
Gather the Necessary Tools
It should go without saying that you need a few key tools to install the SSD in your computer setup. You require a Philips Head screwdriver in this situation. Make sure you have the mounting screws, too. (provided with the motherboard for M.2 SSD or with the PC case for a 2.5-inch SATA SSD).
Before continuing, make sure your workspace is tidy and that all the necessary instruments are put away. To confirm a few elements that differ from board to board, you need have the motherboard handbook on available. Finally, to protect yourself against electrostatic injury, always ground yourself. Wearing an anti-static wrist bracelet is an excellent method to guarantee this.
How to install an SSD (M.2) in your PC?
Remember to use a Philips Head screwdriver to remove the side panels of your PC case before moving forward with the SSD installation. At that point, you will have gained access to the motherboard’s ports. Additionally, don’t forget to access Windows 11’s BIOS and modify the settings to choose the correct NVMe SSD generation.
Installation Guide for M.2 NVMe SSD
1. Verify which M.2 slot on your motherboard supports the NVMe standard. Modern motherboards typically include multiple M.2 slots that can accommodate either a SATA M.2 SSD or an NVMe M.2 SSD, with separate slots for different NVMe generations. The final location to put our M.2 NVMe SSD will be indicated by the location of the NVME M.2 slots in your motherboard’s manual.
2. Remove any SSD heatsink covers that may be on your motherboard once you are certain of the best place to put your NVMe SSD.
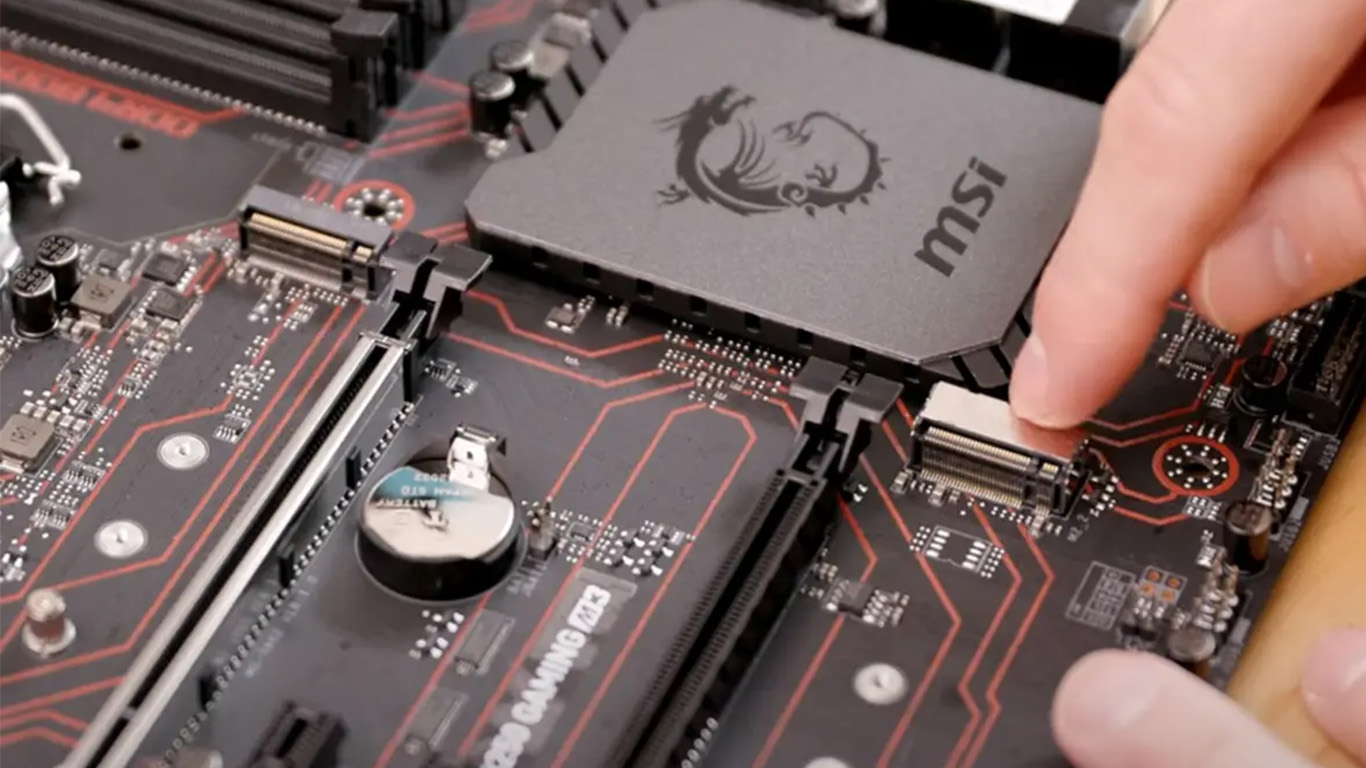
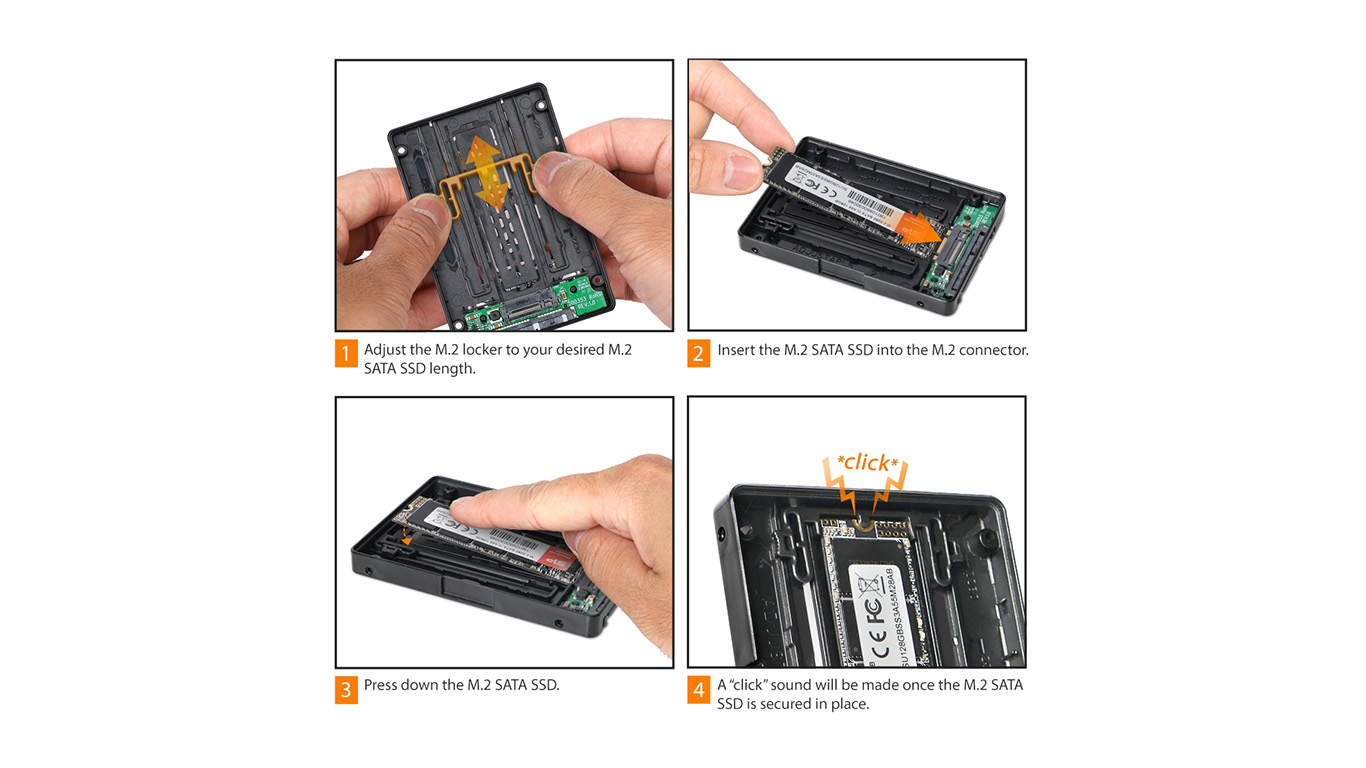
3. After that, insert your SSD at a 45-degree angle into the motherboard’s NVMe M.2 slot.
4. After it has securely slid in place, apply pressure from the SSD’s other end. Your NVMe SSD will be firmly supported on top of the standoff that will be located beneath the M.2 slot. Ours had a standoff with a tool-free installation process; if anything seems strange, see your motherboard instructions.
5. Next, reinstall the heatsink cover over the NVMe SSD. The screw should now be aligned with the SSD and the standoff underneath. Reinstall the heatsink and then screw in the SSD.
6. That’s it, then. Your machine now has an NVME M.2 SSD installed, congratulations. You may now go to the step where we determine whether the SSD was correctly inserted and prepare it for use.
Installation Guide for M.2 SATA SSD
Furthermore, find out which M.2 slot on your motherboard supports SATA SSDs if you intend to install an extra M.2 SATA SSD or upgrade an existing one.
1. SATA SSDs are supported in dedicated M.2 slots on modern motherboards. These can be found in a variety of places, usually at the bottom. Which M.2 slot supports SATA SSDs may be found in the motherboard’s handbook.
2. You can now install the M.2 SATA SSD in the same manner as the NVMe SSD, as we previously explained. The only adjustment required is to make sure it is installed in the SATA M.2 port.
How to install an SSD (2.5-inch SATA) in your PC?
1. Verify where the SATA slots are on your motherboard first. Now, use the SATA cable to attach to the motherboard’s SATA female connector on one side.
2. Next, find the location in your PC chassis where a 2.5-inch SATA SSD can be placed. Place your SSD there after that, and fasten it with the case screws that are included for mounting drives in the storage bay. This procedure requires the use of a Philips Head Screwdriver.
3. After that, connect your SATA cable’s other end to the SATA SSD and the SATA Power Connector. To locate the SATA power connectors, follow the cords of your power source.
4. You’ve now mastered the technique for putting a 2.5-inch SATA SSD in your computer. However, there are still a few tasks left for you to complete. You must check to see if your new SSD is detected by going into the BIOS. The SSD must then be formatted in order for it to be usable.

Confirm Your New SSD Is Installed Correctly
In order to access the BIOS settings, restart your computer and constantly press the Delete or F2 key. Your computer’s first boot-up screen will also direct you to the appropriate BIOS entry button. To acquire information on the same, you can either visit the maker of your motherboard’s website or consult the manual.
The numerous storage devices connected to your motherboard can be seen in the BIOS settings under the “Disk or Storage Information” section. Here, the BIOS will display the name, type (SATA or NVMe), and capacity of your SSD.
Make Your New SSD Ready for Use
Users who are utilizing an existing boot drive to upgrade their PC should first log into Windows. A pop-up will appear once a new SSD has been installed asking you to format the drive before using it. If you do, all you have to do is format the drive using the pop-up, and your drive will be usable.
This is how you format a new SSD and verify its presence in Windows 11 in case the pop-up does not appear. By pressing the “Win” key, bring up the Start Menu. Type “Create and format hard disk partitions.” The disk management tool can then be accessed by clicking the search result.
To find your new drive, scroll down to the drives list and look for the designation “Unallocated Space.” To get the option that will let you create a new volume, right-click the SSD listing. Use this wizard to format the new SSD in Windows 11 when you’ve completed it.
Frequently Asked Questions
Can I just plug in a new SSD?
Yes, you can just insert a new SSD into a slot that is suitable. You also need to connect the SATA power line to a 2.5-inch SSD. They are powered by the motherboard for M.2 SSDs.
Which slot to install M.2 SSD?
SATA and NVMe SSDs require different M.2 slots on the motherboard for installation. Always check your motherboard’s instructions to make sure which M.2 slot you should use for your SSD installation.
Is M.2 and NVMe in the same slot?
No. You insert the NVMe SSD into an M.2 slot that is compatible with it. On the motherboard of the computer, a distinct M.2 slot is used by SATA M.2 SSDs.
Can you put Gen 4 NVMe in a Gen 3 slot?
Yes, a Gen 4 NVMe SSD can be installed in a Gen 3 slot. However, keep in mind that Gen 4 NVMe SSDs will operate at Gen 3 speeds. Therefore, save your money unless you want to soon upgrade to a motherboard that is compatible with PCI-e Gen 4.
Does Gen 4 NVMe make a difference?
Yes, a good Gen 4 NVMe significantly improves speeds over Gen 3 in comparison. Its actual application does, however, depend on the user. For instance, a content creator must deal with a lot of data. The most recent NVMe SSDs are helpful in these circumstances.
Why is my SATA M.2 SSD not being recognized?
The M.2 NVME SSD won’t function if it is inserted into an M.2 slot that isn’t compatible with it, such one made for SATA SSDs.
Installing an SSD in Your Computer
That’s basically all there is to know about mounting an NVMe or SATA SSD on the motherboard of your desktop computer. You will have successfully installed an SSD in your PC if you follow the procedures above. Have you previously used a conventional hard drive (HDD)? If so, the speed differential will be extremely large. You won’t ever go back to HDDs because of how quickly the game and boot up.
We advise using SSD management software, such as Samsung Magician, to actively check the solid-state drive’s health and optimize it. Learn how Microsoft is utilizing the DirectStorage API, which is only available on NVMe SSDs, to provide PC games with more detailed assets and faster load times by reading this article. Please let us know in the comments section below if you run into any problems during installation or have any questions.